Don't Burst Under Pressure: A Practical Guide to Expansion Tank Repairs
Expansion Tanks Repair: Stop Pressure Problems Before They Damage Your System
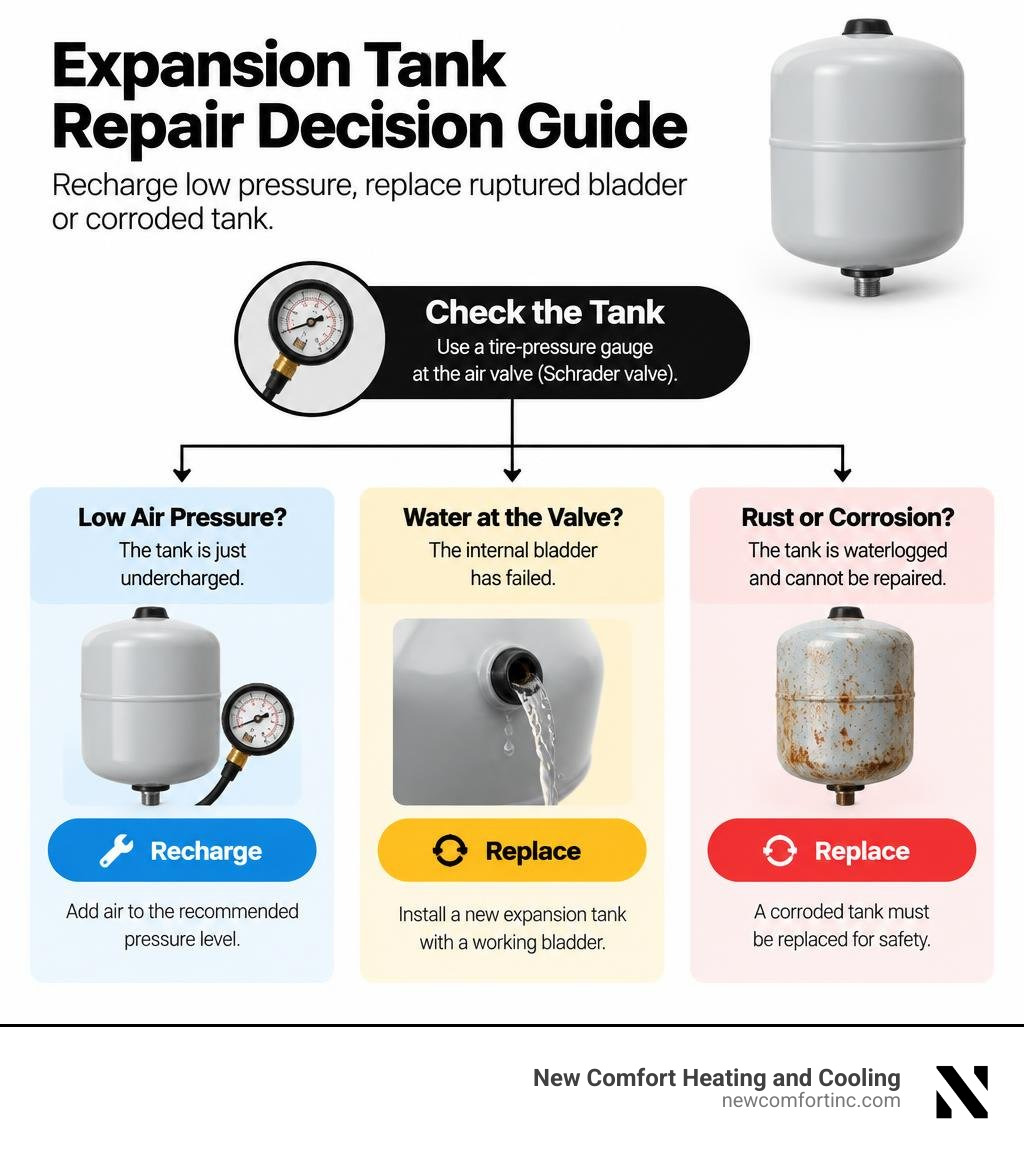
A failing expansion tank can cause pressure spikes, dripping relief valves, banging pipes, and water leaks. Start by shutting off power or gas, letting the system cool, and checking the tank's air valve with a tire-pressure gauge. If the tank has simply lost air pressure, it may be recharged. If water comes out of the Schrader valve, the internal bladder has failed and the tank needs replacement.
Expansion tanks absorb the extra volume created when water heats up in a closed plumbing or boiler system. Without that air cushion, pressure can climb until a relief valve opens or a weak fitting begins to leak.
This guide explains safe expansion tanks repair, including how to tell the difference between a low air charge, a leaking valve core, and a waterlogged tank that cannot be repaired.
Expansion tanks repair definitions:
Diagnosing Symptoms That Require Expansion Tanks Repair
When water is heated, it undergoes thermal expansion. Because water is an incompressible liquid, heating a 50-gallon water tank increases the physical volume of that water. In modern closed-loop plumbing setups—where backflow preventers, check valves, or pressure-reducing valves (PRVs) prevent expanded water from pushing backward into the municipal supply—that extra volume has nowhere to go.
Without a working expansion tank to absorb this dynamic surge, your plumbing experiences hydraulic shock and extreme pressure spikes. Over time, recurring pressure surges strain pipe joints, erode appliance seals, and shorten the operating life of your water heater or hydronic boiler.
The most common symptom that prompts an expansion tanks repair assessment is a dripping temperature and pressure relief (TPR) valve. These safety valves are designed to discharge water when system pressure exceeds design limits (typically 150 PSI for potable water heaters and 30 PSI for residential hydronic boilers). If your TPR valve continually drips during a heating cycle, excessive thermal pressure is forcing it open.
Other clear warning signs include loud water hammer (banging pipes when faucets are shut off), erratic household water pressure, and visible moisture pooling around the top fittings of the tank.
| Symptom / Finding | Probable Cause | Action Required |
|---|---|---|
| Air hissing from Schrader valve | Loose or faulty valve core | Replace valve core and recharge |
| Air pressure lower than baseline | Natural membrane permeation | Drain system pressure and recharge |
| Water spouts from air valve | Ruptured rubber diaphragm | Full tank replacement required |
| Heavy thud during tap test | Waterlogged internal chamber | Full tank replacement required |
| External rust or seam leaks | Structural corrosion | Full tank replacement required |
| TPR valve dripping constantly | Lost air cushion or failed bladder | Diagnose bladder integrity immediately |
Recognizing a Waterlogged Tank and Bladder Rupture
A standard thermal expansion tank contains an internal rubber diaphragm or flexible butyl bladder that divides the vessel into two distinct chambers: an air chamber pre-charged with pressurized air, and a water chamber connected directly to your plumbing system.
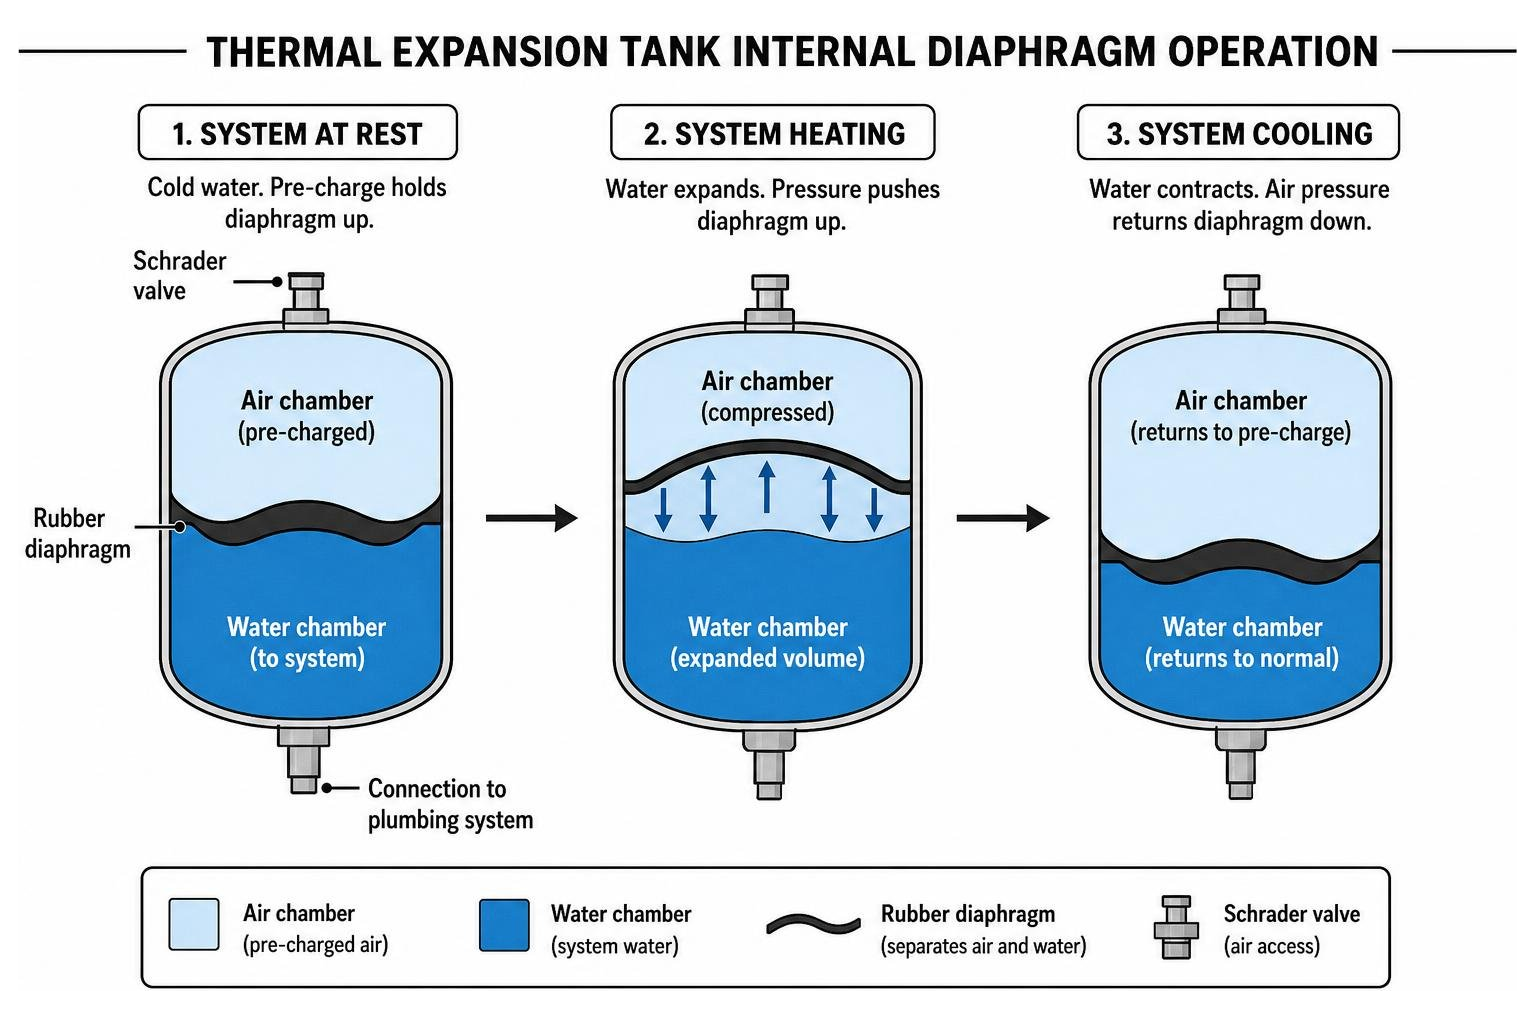
When the internal bladder develops pinhole tears or ruptures completely, water crosses into the air cushion chamber. As air dissolves into the water or escapes out the Schrader valve, the entire vessel fills with water. This condition is known as a waterlogged tank. A waterlogged unit provides zero expansion absorption.
You can often spot a waterlogged tank visually. Because the vessel is filled with cold water entering the system, heavy condensation may form across the metal exterior. The tank shell will feel cold and heavy, placing immense stress on surrounding pipe fittings. For a deeper breakdown on pinpointing these internal leaks, review our guide on How to Repair a Leaking Expansion Tank.
Performing the Tap Test and Schrader Valve Check
To evaluate whether your tank is functional or waterlogged, perform two quick diagnostics: the acoustic tap test and the Schrader valve depression check.
The Acoustic Tap Test: Take a small metal wrench or coin and gently tap the exterior shell of the expansion tank from top to bottom.
- Healthy Tank: The top section (or water side) should produce a dull, solid thud, while the bottom section (the pressurized air side) should produce a clear, hollow metallic ring.
- Failed Tank: If the entire vessel produces a dull, heavy thud from top to bottom, the tank is completely waterlogged.
The Schrader Valve Check: Locate the standard air valve (identical to a car tire valve) on the base or top of the tank. Remove the protective plastic cap and use the tip of a small screwdriver or your thumbnail to depress the center valve stem for half a second.
- Air Hisses Out: The internal bladder is intact, though the air cushion may still need calibration.
- Water Spurts Out: The internal diaphragm has ruptured completely. Water has entered the air chamber, confirming the tank is dead and must be replaced immediately.
How to Safely Depressurize and Service Your Tank
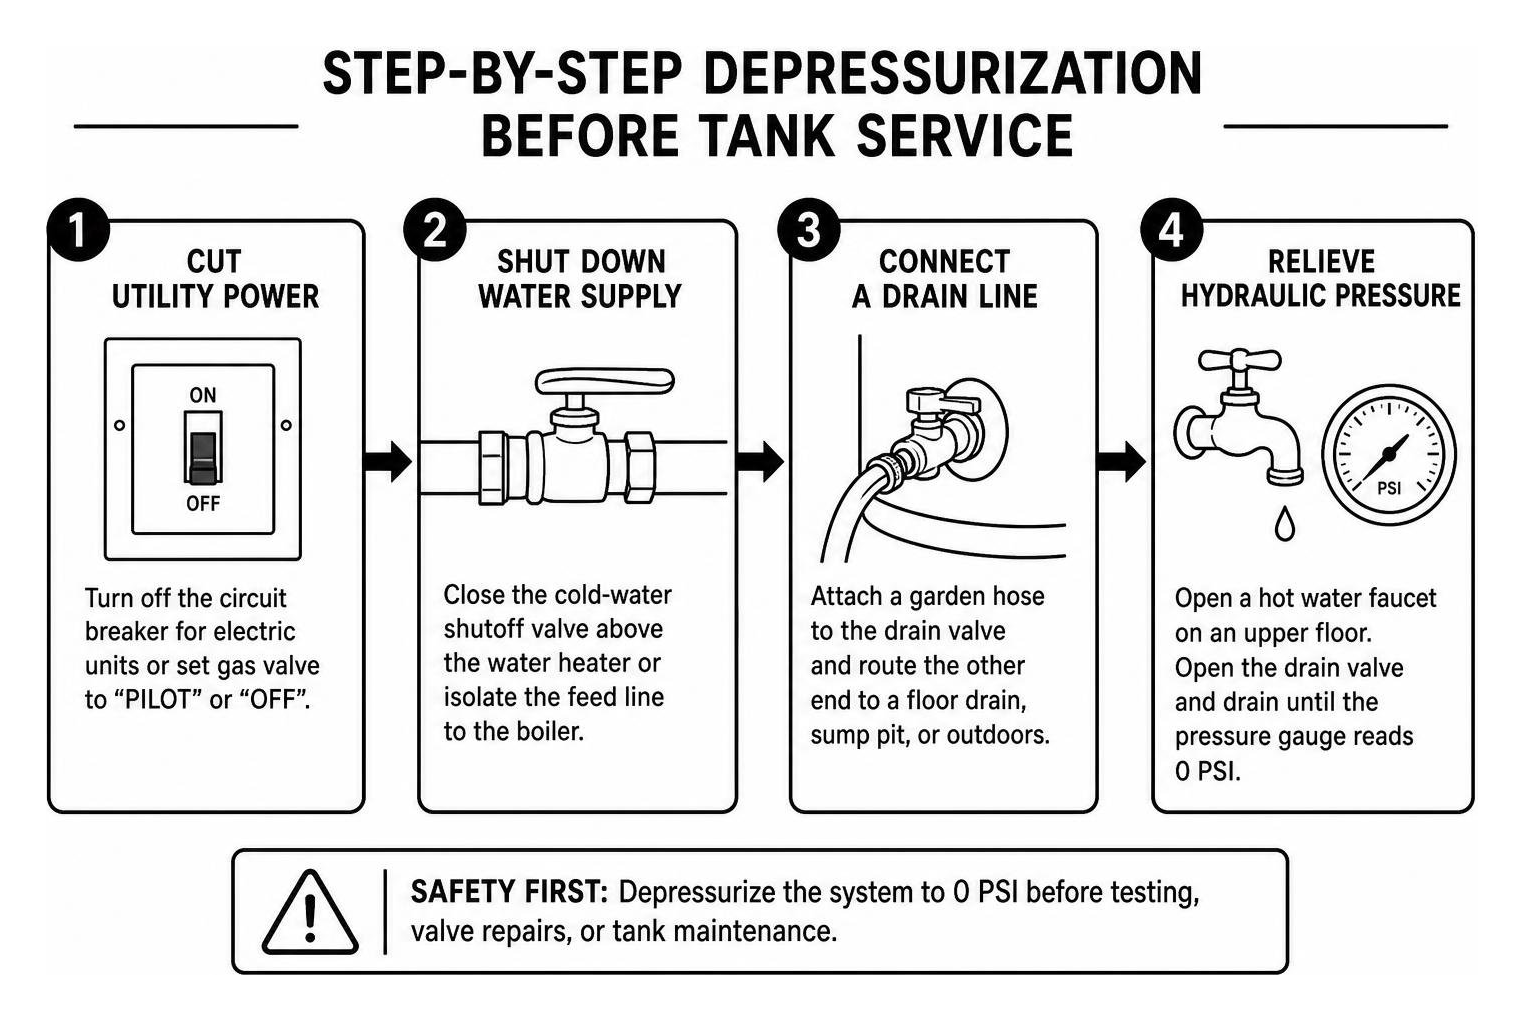
Before performing any pressure testing, valve repairs, or tank maintenance, you must bring the plumbing or heating system down to a true zero-pressure state. Testing air pressure on an expansion tank while the plumbing system remains under municipal water pressure will yield false high readings, as the incoming water pushes against the flexible bladder.
Follow this safety protocol to isolate and depressurize the workspace:
- Cut Utility Power: Turn off the circuit breaker for electric water heaters or boilers. For gas units, rotate the gas control valve to the "PILOT" or "OFF" position. This prevents the heating elements or burners from firing dry while the system is drained.
- Shut Down the Water Supply: Close the cold-water shutoff valve located directly above your water heater, or isolate the feed line to your hydronic boiler.
- Connect a Drain Line: Attach a standard garden hose to the heater or boiler drain hose bibb, routing the other end to a floor drain, sump pit, or outdoors.
- Relieve Hydraulic Pressure: Open a hot water faucet on an upper floor to allow air into the pipes, then open the drain valve on your heating unit. Drain enough water until system pressure drops to 0 PSI on your pressure gauge.
Step-by-Step Expansion Tanks Repair: Recharging Pressure and Replacing the Valve Core
If your diagnostics reveal that the bladder is intact (no water escaped the Schrader valve) but the tank has lost its air charge, or if air is slowly leaking through a worn valve core, you can execute a straightforward field repair.
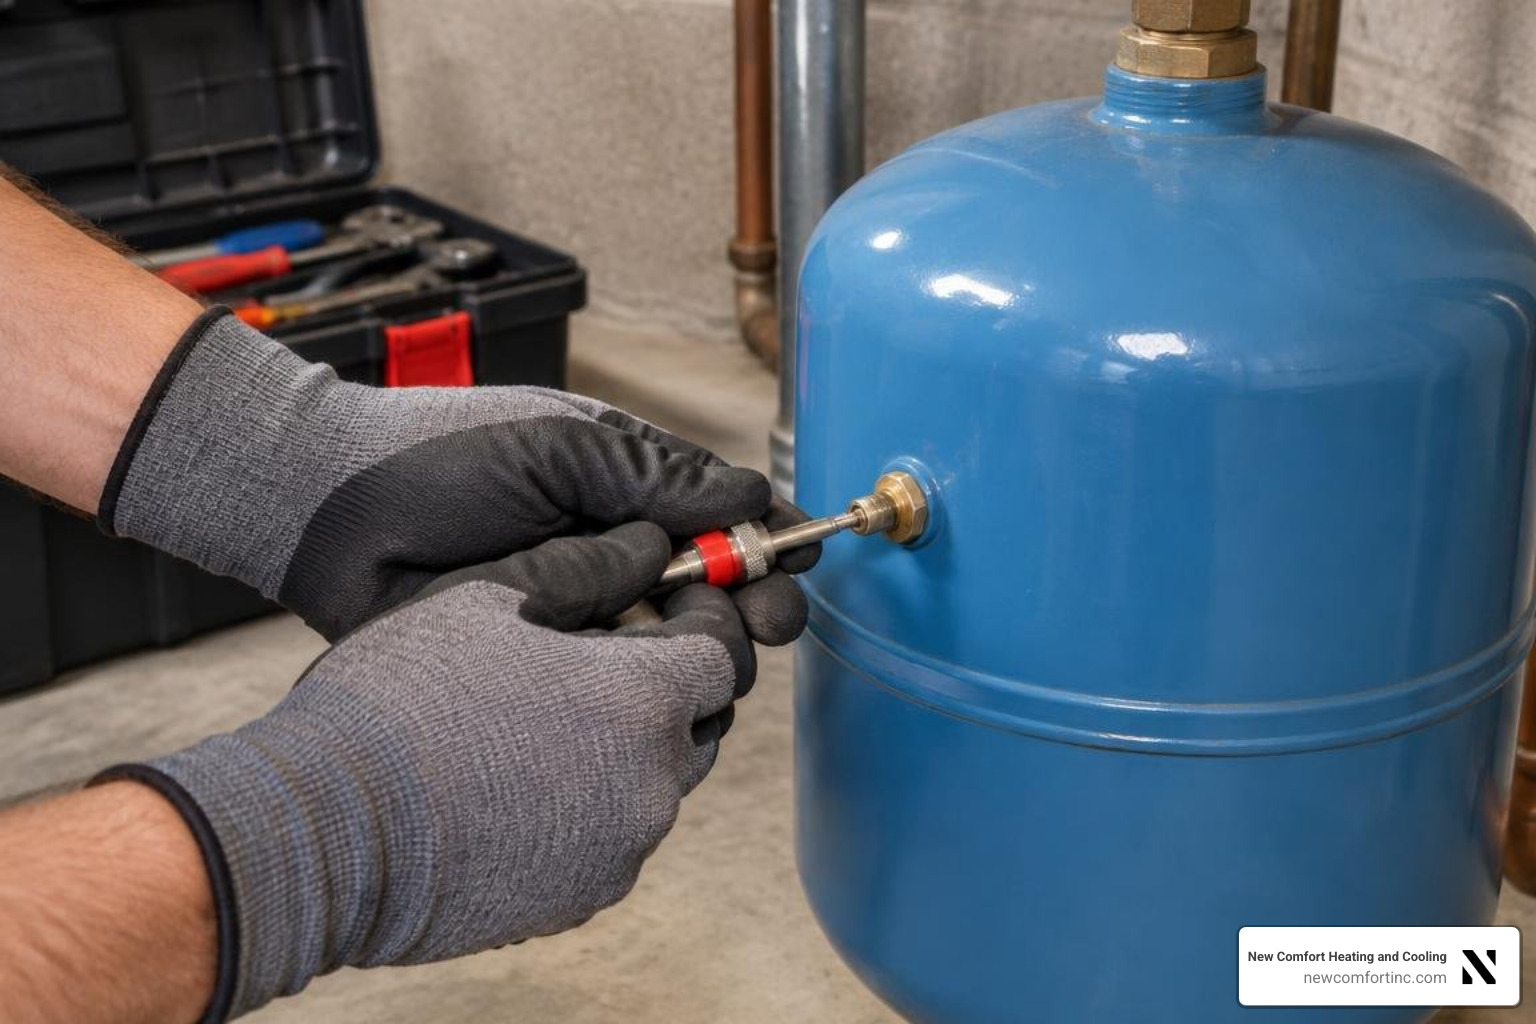
Replacing a Faulty Schrader Valve Core
A worn or corroded valve core can allow pressurized air to bleed off over several months, simulating a tank failure.
- Step 1: With the plumbing system fully depressurized, unscrew the plastic valve cap.
- Step 2: Insert a four-way Schrader valve core tool into the valve stem, engaging the internal core prongs.
- Step 3: Rotate counterclockwise to remove the old, faulty core.
- Step 4: Thread a new brass valve core into the stem, tightening it clockwise with the tool until it is snug. Avoid over-torquing, which can tear the tiny rubber seal.
Recharging the Air Cushion
- Step 1: Connect a manual bicycle pump or a small oil-free air compressor to the Schrader valve.
- Step 2: Slowly add air while keeping the heater's drain valve open. Any residual water pushed out by the expanding bladder will exit through the drain hose.
- Step 3: Use a calibrated digital tire pressure gauge to check the pressure reading.
- Step 4: Once the exact target PSI is reached, replace the valve cap tightly to prevent dirt ingress and micro-leaks.
For specialized procedures involving hydronic boilers and bladderless steel tanks, consult our detailed walkthrough on Heating Boiler Expansion Tank Drain / Repair.
Calibrating Static Water Pressure and Pre-Charge PSI
An expansion tank cannot perform its job if its internal air pressure is mismatched with the building's incoming static water pressure.
- Potable Domestic Water Systems: Measure your home's incoming static water pressure by attaching a water pressure gauge to an outdoor hose bibb or utility sink faucet while no other fixtures are running. Standard household pressure is typically between 50 and 60 PSI. Your expansion tank's pre-charge air pressure must be adjusted to match this baseline reading exactly before the water supply is reopened.
- Closed Hydronic Heating Boilers: Residential hydronic heating systems operate at much lower baselines. A typical single-family residential boiler requires a cold fill baseline pressure of 12 to 15 PSI. The boiler expansion tank must be calibrated to match this 12–15 PSI cold fill setting.
If incoming municipal pressure exceeds 80 PSI, a pressure-reducing valve (PRV) must be installed on your main water line to protect your plumbing and expansion vessel from structural stress.
When to Replace vs. Repair Your Expansion Tank
While a loose valve core or a depleted air cushion can be repaired in under an hour, structural tank failures cannot be patched or rebuilt.
Because an expansion tank is a closed pressure vessel subjected to continuous thermal cycling, attempting to patch pinhole leaks, weld rusted seams, or repair a shredded internal bladder poses severe safety risks.
A ruptured tank that is ignored can lead to sudden water heater failure, basement flooding, or excessive boiler pressure that forces the continuous discharge of scalding water. In extreme boiler installations, unchecked over-pressurization can deform flue components, presenting a risk of carbon monoxide leakage into living spaces.
If your tank shows signs of external corrosion, deep rusting at the threaded connection nipple, or a ruptured diaphragm, replace the entire unit. For expanded sizing charts and hardware requirements, consult The Ultimate Expansion Tank Installation Guide.
Step-by-Step Expansion Tanks Repair and Full Unit Replacement
When replacement is required, follow these steps to install a new thermal expansion tank correctly.
- Depressurize and Support the Old Tank: Follow the shutdown and depressurization steps detailed above. A waterlogged 2- to 5-gallon tank can weigh between 30 and 50 pounds. Place a bucket underneath and support the base of the tank with one hand to prevent it from dropping suddenly and snapping your copper or PEX supply lines.
- Unthread the Failed Vessel: Use a pipe wrench to hold the brass tee or distribution fitting steady, and use a second pipe wrench on the tank's hex fitting to unscrew the old tank counterclockwise.
- Inspect and Clean Fittings: Clean the male and female threads on the plumbing connection using a wire brush to remove old pipe dope and mineral deposits.
- Pre-Charge the Replacement Tank: Before mounting the new tank, check its air pressure using a digital gauge. New tanks typically arrive from the factory pre-charged to 20–40 PSI. Use a hand pump to match the pre-charge pressure to your home's static water pressure (or boiler cold-fill pressure) while the tank is disconnected from the plumbing.
- Seal the Threads: Wrap the 3/4-inch NPT threaded connection with 3 to 4 turns of PTFE plumber's tape in a clockwise direction, followed by a thin, smooth coating of plumbing thread sealant (pipe dope).
- Mount the New Tank: Thread the new expansion tank into the tee fitting by hand to avoid cross-threading. Finish tightening with a wrench until snug. If the tank is installed horizontally, secure it with a dedicated wall-mounting bracket or support strap to prevent mechanical strain on the piping.
- Re-pressurize and Test: Close the drain hose bibb. Slowly reopen the cold-water supply valve to pressurize the system. Open a nearby faucet to purge trapped air from the lines. Inspect the threaded connection for any signs of seepage, then restore power or gas to your heating unit.
Expansion Tank Sizing, Placement, and Code Basics
A replacement tank only works if it is the right size and installed in the right place. Sizing depends mainly on the volume of your water heater or boiler system and your incoming water pressure. A small 2-gallon tank is common on a typical 40- to 50-gallon water heater at normal household pressure, but larger heaters, higher pressure, or boilers with lots of radiation may need a bigger vessel. Always confirm with the manufacturer's sizing chart rather than guessing.
For a water heater expansion tank, the usual location is on the cold-water supply line near the heater, between the shutoff valve and the tank inlet. Vertical mounting with the connection on top is preferred, since it helps prevent sediment from settling against the diaphragm. If a tank must hang sideways, support it with a strap or bracket so its weight does not pull on the piping.
Many local plumbing codes require thermal expansion control whenever a home has a closed system - for example, after a pressure-reducing valve, backflow preventer, or check valve is installed at the meter. If your village or water utility recently replaced your meter, it is worth checking whether your system is now closed and needs a tank.
Water Heater Expansion Tank vs. Boiler Expansion Tank
These two tanks look similar, but they are not interchangeable. A potable water heater expansion tank is built and certified for drinking water and usually ships with a higher factory pre-charge. A boiler expansion tank is designed for closed hydronic heating loops, where the water is not meant for drinking and pressures are much lower.
Installing a boiler expansion tank on a domestic water line can introduce materials that are not approved for drinking water. Installing a potable tank on a boiler without adjusting its pre-charge can leave the heating system over-pressurized. Check the label before you buy, and match the pre-charge to your system as described above.
When to Call a Professional for Expansion Tanks Repair
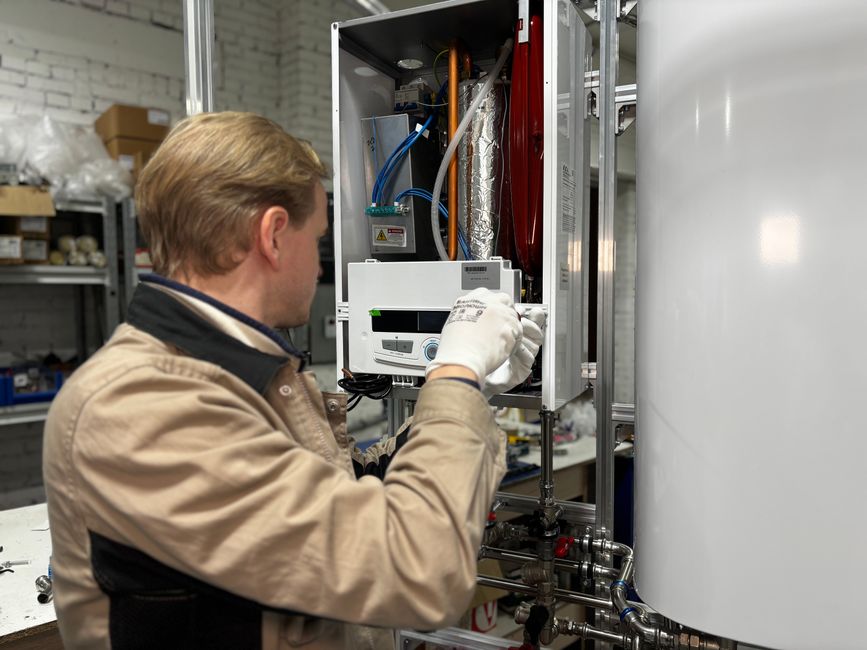
A simple recharge or valve core swap is a reasonable DIY job for a handy homeowner. Some situations, though, call for a licensed technician:
- Incoming water pressure stays above 80 PSI, or your pressure-reducing valve has failed.
- The relief valve on your water heater or boiler keeps discharging even after the expansion tank has been recharged.
- The tank is installed in a tight space, overhead, or on piping that would need to be cut, soldered, or re-supported.
- You have a hydronic boiler and are not sure of the correct fill pressure, or the system needs to be purged of air afterward.
- You see corrosion on the tank, the fittings, or the water heater itself.
At New Comfort Heating and Cooling, our technicians can inspect your expansion tank during water heater or boiler service and diagnose pressure problems before they damage your equipment. If your relief valve is dripping or your boiler pressure is climbing, call us at (708) 717-9995. For broader advice on keeping a tank-style heater healthy, read our guide to gas hot water heater maintenance.
Frequently Asked Questions About Expansion Tank Maintenance
Can You Patch a Leaking Expansion Tank?
No. An expansion tank is a certified pressure vessel that operates under continuous hydraulic stress. External epoxies, pipe clamps, or sealants cannot withstand the constant thermal expansion cycles and internal pressures of 50 to 150 PSI. Any attempt to patch an external leak or weld a rusted seam creates a severe burst hazard. If the outer steel shell or internal bladder fails, the tank must be replaced.
How Long Do Heating and Plumbing Expansion Tanks Last?
Most residential expansion tanks have an operating lifespan of 5 to 10 years. Longevity depends on incoming water quality, water hardness, system pressure stability, and whether the air cushion is maintained annually. Hard water with high mineral content can cause rubber diaphragms to become brittle and lose flexibility sooner. Checking and adjusting your pre-charge pressure at least once a year will help prevent premature bladder fatigue.
Why Is My Boiler or Water Heater Relief Valve Leaking?
A dripping TPR valve is almost always the result of thermal expansion in a closed plumbing system without an adequate air cushion. When an expansion tank becomes waterlogged or loses its air pre-charge, heated water has no room to expand, causing pressure spikes that push the safety relief valve past its discharge threshold. Replacing a failed tank or recharging a depleted air chamber resolves the issue in most systems.
Conclusion
A well-maintained expansion tank protects your plumbing system from invisible pressure spikes and prevents premature failure of your water heater or boiler. By performing regular acoustic tap tests, inspecting the Schrader valve, and verifying your static pre-charge pressure annually, you can catch minor issues before they cause property damage.
If your system requires professional diagnostic testing, safety valve inspections, or code-compliant equipment replacement, New Comfort Heating & Cooling is ready to assist. Our technicians provide same-day response and 24/7 live phone support throughout the Chicago and Justice, Illinois areas. Explore our full range of comprehensive heating services to keep your home's heating and plumbing systems operating safely and efficiently.